Featured

My First Blog Post!

Hello, everyone! I am new to blogging and generally bad at new technology, so here’s hoping this looks sort of nice and organized. You might find that my main page is a little redundant right now, but it at least has all the things it needs – links to my social media accounts, methods for contacting me, a link to a formal “About” page, and shameless advertising of my own work in multiple places. My home page also has a link to an overview of what “print-on-demand” actually is, but I’m going to post it again here in case you find the blog entries before that:

“What is print-on-demand? Reading it just literally, it means that someone prints something when someone else demands it. How does that translate into e-commerce? Various online companies offer a certain set of products that they only produce when someone places an order – no warehouse stock, just “on-demand” product creation. Some of these companies have found a way to expand their sales by basically “hiring” thousands of freelance designers (me, possibly you too) to create designs for their blank products. When a product printed with one of these artists’ designs sells, the company pays them a commission in the form of a set or adjustable margin. It’s a neat deal (much better than a pyramid scheme) where the designer doesn’t have to deal with production, shipping, or customer complaints, and also has the potential to make passive income forever. The company then gets thousands of designers creating works that taken together, appeal to a massive audience. They also get some free advertising every time one of their artists promotes their products on social media.

Important: I’ve found that none of the sites I sell on require exclusivity or try to take ownership of your work, but you should always check the user agreement to make sure you retain the rights to your work before you start any kind of art business venture. I also only sell on sites that allow you to have a free profile. There are ones out there that charge you a monthly fee to use.”

And that is a solid introduction to what this whole blog will be centered around: print-on-demand and how the different print-on-demand companies work. I sell on over 18 sites, and I’m adding more all the time, so I have a significant bit of knowledge on the subject, and I’ve become more tech savvy with it than I ever could have expected a year or so ago. I’d love it if people followed and kept up with this blog, but if you happen to just find it in passing, and you have a specific question about print-on-demand, feel free to ask me directly instead of trying to sift through my articles on the subject. I’m lucky to be part of a supportive internet artist community, and I’d like to give back. My next post will be a deep dive into how to buy and sell things through Redbubble, the original store I opened in June of 2018. Read on if you’d like to know EVERYTHING about how to upload and sell your work there.

Society6: In-Depth View

To set up a Society6 account, all you really need is a Paypal account (I’m not sure if you can get things deposited into a bank account directly, but I think that’s possible too) and an email address (which you will have if you have a Paypal account). That’s pretty much standard for any print-on-demand store profile. Society6 then gives you the option to write out a short bio (that will appear below your profile picture in the center of your profile), choose a profile picture, choose a banner, and then there is an option to set the margin on your prints only.

After you set up your profile, you’ll access all these settings again by going to the Society6 main site, logging in (with the very tiny word “login” in the upper right of the screen), then clicking the icon that looks like a black circle with two smaller white circles in it (it will be right where the word “login” was after the screen reloads). If you click it, it will take you to view your own store profile. If you hover over it, you’ll see options to manage your posts, and see your orders, collections, “promoted” (any designs you’ve favorited from other artists), earnings, and referrals (you can refer a friend to the site via email, and they get 20% off their first purchase, and you get 20% off your next purchase).

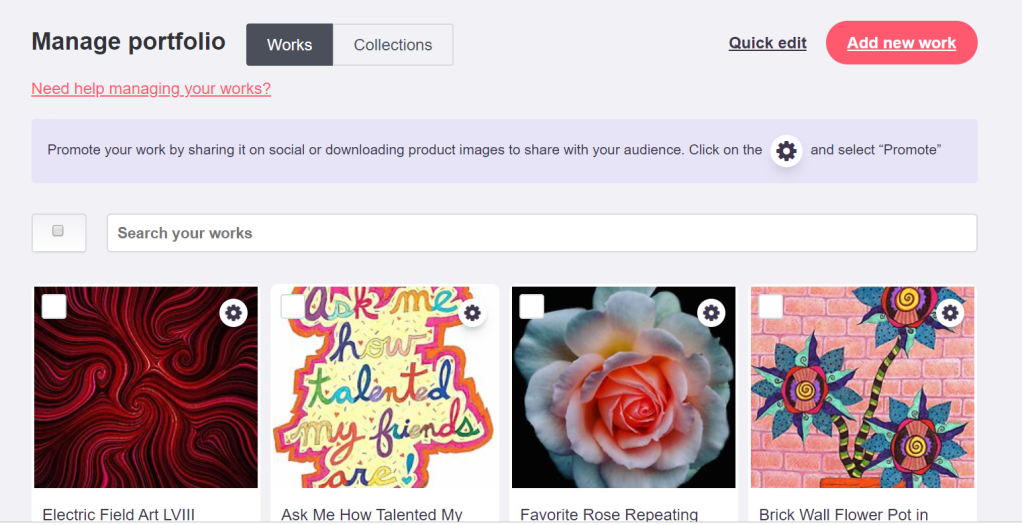
I use “manage posts” a lot because it shows you 20 designs at a time and has a mini search bar at the top of the gray box in the center of the screen that allows you to search the title of one of your designs and then see it immediately. The three dots icon at the end of each design can be clicked to see options to edit products (edit how your design looks on various products), edit info (edit the title, tags, and description of your work), or delete the design. If you hover your mouse over a design, an option will pop up below the title to “view enabled products.” If you click this, all the products will open below the design in miniature, and you can click individual ones to see their store listings in a new window. This is very useful for me when I want to copy the link to specific product for somebody. You can also access all your profile options via headings at the left of the screen from “manage posts.” Right above all of your designs and next to the mini search bar are two buttons: “+ art post” and “+ blog post”. Adding an art post is how you upload a new design. I do not use the blog functions of Society6 but I assume it’s much like creating a text post on most social media sites.

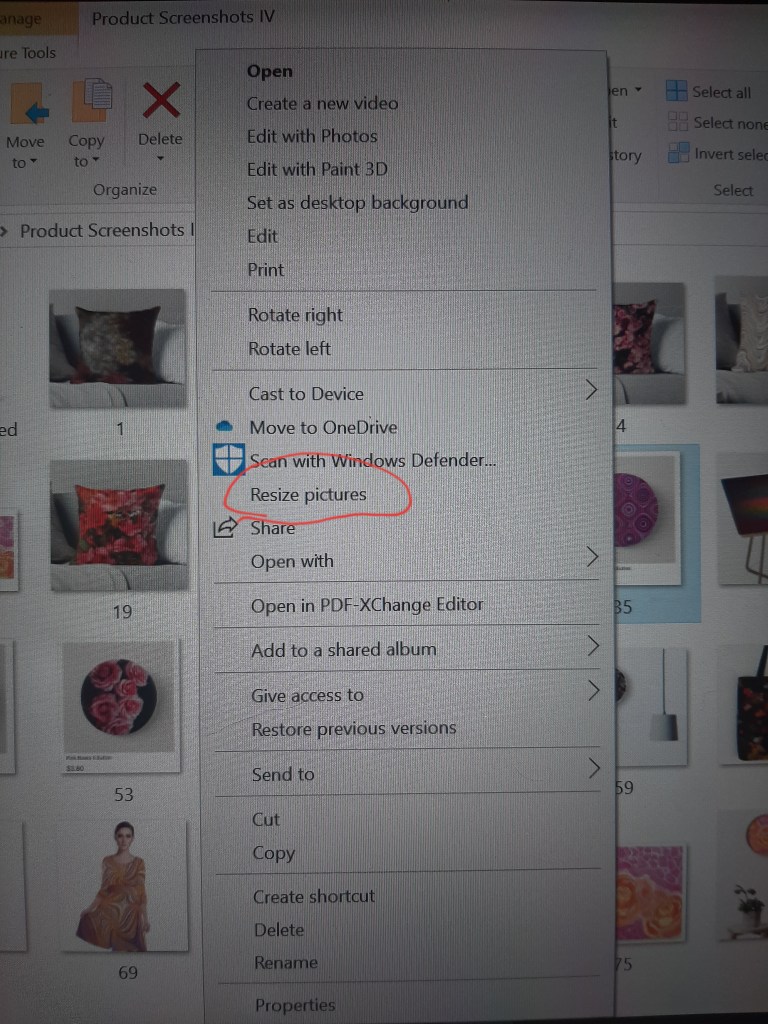
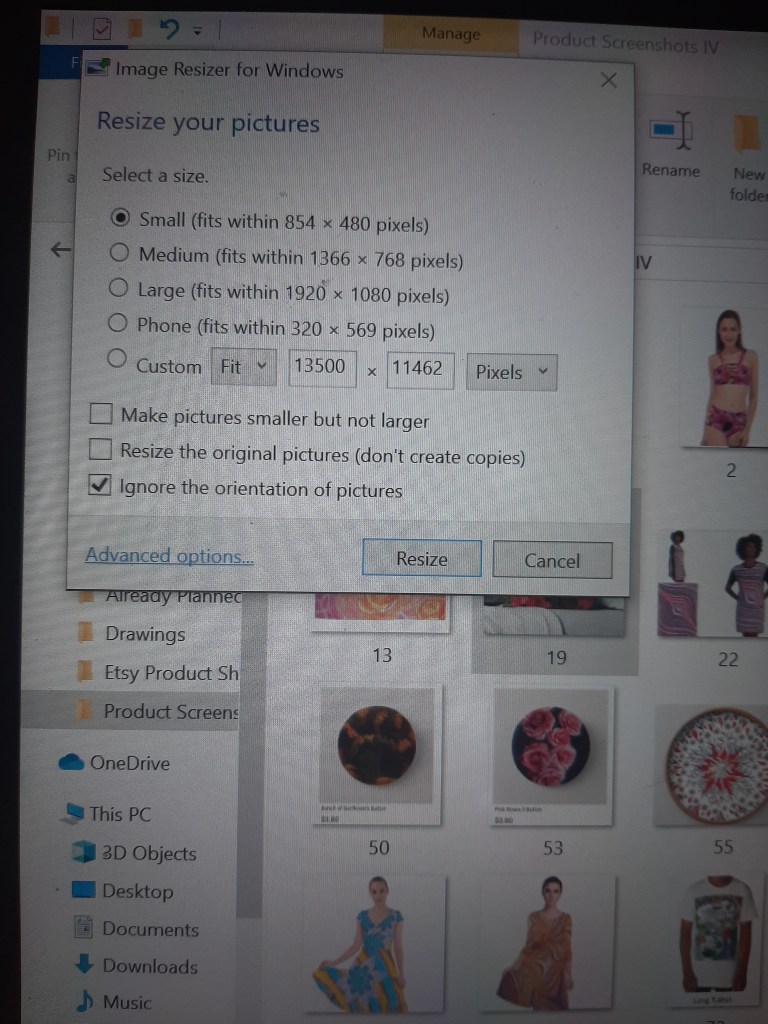
When you go to upload a new design, the first screen will be for the actual uploading of the file. I use an image size of 7000 x 7000 pixels because that enables my designs on most products (except gym bags, which I still can’t figure out). If you don’t have a good image resizer, I highly recommend Image Resizer for Windows (not sure how to help you if you have a Mac): http://www.bricelam.net/ImageResizer/ – You can download it here at this link, and it will add an extension so that when you right click an image in your gallery, “Resize pictures” shows up as an option in the gray box. After the image uploads, you’ll have two boxes to check, one confirming that this is an original piece of your work and the other setting it to NSFW (if that doesn’t apply, don’t check it). The next screen will be for entering the image title, description, tags, (which I believe you get 20 of), and selecting the media of your work. Click next at the bottom to get to the product adjustment screen. Here is where you will individually enable each product you want to sell (with the on-off switch below each product picture). Don’t worry if it takes a bit for your image to appear on the example products; if the site lets you enable it, it is there. Clicking an image will bring up options to edit how it looks on the product. You can adjust the position by clicking and dragging it around, and you can adjust the size of the image with the scale slider at the lower left. Once you’re satisfied, click the back “Save & Close” button. This will take you back to the products screen. When you’re done adjusting all the products, scroll back to the top and click the black “Publish” button at the upper left. Your products will then be available for sale to the public.

Now there is also a new artist studio called “Beta,” and if I had to guess, I’d say Society6 is probably going to slowly merge over to using it exclusively instead of “manage posts” and “+ art post”. This studio looks much more like other print-on-demand dashboards and shows 85 designs at a time in either grid or list view (which you can change at the upper left -tiny words). The top of the screen has the same mini search bar to search within your work plus new ways to filter and organize your work (by publishing status, date published, alphabetical, etc.). Two buttons at the top (white with black outlines) take you to “Set Store Markups” (mark ups for your prints) or “Add New Work.” The latter button takes you to an upload screen entirely different from the one I previously described. It appears that you can upload multiple sizes at a time (PNG, JPEG, and RGB files only) to fit different products, and you type the title on this screen as well. The next screen (after you click the black “continue” button) is basically the same thing as previously described: check that it’s your original work and/or that it contains mature content. The third screen looks almost exactly the same as the other product adjustment screen, but now the place to categorize, describe, and tag your work is combined with this at the left of the screen. You also must now certify that your tags and description do not contain copyrighted words. The green publish button is at the bottom of the left side panel now, and clicking it just publishes the work without taking you to a new screen. If you have more works to add, the button for that is still at the top of the screen.

Final notes about Society6: 1) They pay artists the least out of all the sites I am on (18). Your margin is fixed at 10% for all non-print products, but Society6 also tends to be my most expensive site. I find this slightly annoying, but I want my work to be accessible across a variety of platforms. 2) Society6 is very aggressive about suspending work that has the slightest chance of violating copyright. This is good because it prevents art theft, but you have to be careful to make sure when you’re uploading your original photography that there are no copyrighted logos in the background of your image. I had one work suspended because there was a very tiny Honda logo visible on the bumper of a car. The good news is that Society6 rarely suspends whole accounts for a mistake like that. 3) I would suggest learning to use the Beta uploader first or only because it seems very clear to me that Society6 is trying it out with the intention of making it the sole method of uploading and publishing works.

Redbubble Update: Sitewide Change

A month or two ago, I wrote a detailed description of how Redbubble is set up and how to get your work uploaded and ready to sell. While the location of the “Add New Work” feature is in the same place (while logged in, click your profile picture in the upper right, then scroll down to “Add New Work” (it’s a big pink button) in the small dark blue box that pops up), the layout of the store homepage has completely changed, and not for the better in my opinion.

The “public profile,” a.k.a. the long bio that you could previously add (to tell the rest of your artistic story) in addition to your 500 character short bio is no longer supported. You can still find it within your profile settings in case you need to copy any information out of it and into your short bio, but that will likely disappear completely soon, so time is of the essence if you want to save any information from that.

Your short bio and social media links are now all the way down at the bottom of your page (so someone would most likely have to be looking for it in order to see it), and clicking on the social media buttons no longer opens your profiles in a separate window but instead changes the current page (your Redbubble store) to that profile. I personally find this annoying because I don’t want to lose the page I’m on when opening external links. If you right click and then do “open link in new tab” it will open your social media profiles separately, but for less tech-savvy shoppers who don’t know that this has changed, I think this could be a pretty significant inconvenience (Ex: for my mother, if a website does something like taking her away from the page she’s on unexpectedly, she is NOT happy).

Your collections (with cover photos) are now listed just below your banner and profile picture (now in the center of the screen). There are arrows on the side so that you can scroll through them if you have more than will fit in that tiny space. There is also a “Collections” category at the top left that you can click to reveal the titles of all your collections, and you can in turn, click on each of those titles to see products from within that album.

There is no longer a “Porfolio” feature, so you cannot search by design unless you know the exact title and search it on the main site. For example, my most popular design is “Trippy Forest,” and you could search that title in the search bar at the very top of the page to look for that over the entire Redbubble site (searching among thousands of artists’ designs), but you can’t just look through all my designs within my own store anymore. The closest thing to that is looking at products within a collection, but you’d have to know “Trippy Forest” is filed under my “Drawings” collection in order to find it fast (you could, of course, just click through all my collections), and you still wouldn’t be able to sort it out among the rest of the designs I have under “Drawings.” I think that’s a significant downside to the new layout, and I’ve emailed Redbubble and told them so. The good news is that if you are a fan of mine and follow me on social media, I always post direct links to all the products I share. Basically, if you see a picture of it, somewhere in the description there will be a web address for it. I also include the titles of all my works in posts, so if you do want to see a design on other products, just search the title in the main search bar, or message me through a social media platform, and I will find a direct link for you.

I have discovered that in the same way that Teepublic and RageOn work/used to work, if you click on a product that has the design you want (even if you want it on a different product), you can then scroll down below the main project image on the screen it takes you to and click “Avaliable on +[insert number] products,” and it will bring up a panel of ALL products that have that design. Again, much less convenient that Portfolio view, but still a possible way of navigating to the item you want.

Redbubble customer support swears to me that they’ve done research that says this new layout helps people find what they like from a store more often/more quickly and should increase sales (if not for me individually, for artists in general). I don’t doubt they have done that sort of research, I just think the new layout is really going to throw past customers (particularly my close friends and family), and I really miss the Portfolio feature that let me view all the products I had for a single design in two clicks.

If you need any help navigating the new Redbubble layout, or the layout of any store I sell on (all 18 have buttons here: https://linktr.ee/okhismakingart), send me a message over Facebook, Instagram, or Twitter, and I’ll message you back as fast as possible with assistance.

Society6: A Brief Overview

Society6 is another print-on-demand store that I sell on, and it’s second only to Redbubble in the number of “random discoveries” I tend to get (people who don’t know me buying my products). Those are the two big names in print-on-demand that most people know about if they do, so that makes sense.

While Society6 does bring me occasional sales, there are a few things I don’t like about it when compared to Redbubble. The uploaders are similar, but Society6 has three pages you go through: one for the design’s upload; one for the title, description, and tags; and one for the actual enabling of products. Unlike Redbubble, Society6 does not auto-enable all available products that your image fits on. You have to go through and click the on button for every product it will allow you to (if your image doesn’t fit the dimensions of a product, it will be grayed out and unable to be turned on). You can click individual products to adjust your images on them, but it frequently takes forever for the individual product editors to load (also unlike Redbubble, which opens them instantly). The proper image sizing dimensions are also hard to find (which seems to be a commonality with a lot of print-on-demand stores). I tend to use 7000 x 7000 pixels as my image size. It usually enables all products but gym bags, and it’s an absolute mystery to me as how to get those to work. If you’re using a PC and don’t have a good image resizer, I highly recommend downloading Image Resizer for Windows here: https://www.bricelam.net/ImageResizer/ The download will add a “Resize” extension that you’ll see in your gallery anytime you right click an image.

Another thing that mildly irritates me about Society6 is that you cannot set your own margin. You will make a fixed 10% (which isn’t a lot per sale) on all products except your art prints, which you can increase the dollar amount of individually. I want my work to be available many places to make as many sales as possible, and that’s the main reason I have Society6. It also has a few unique products not available on any other sites like its version of wood block wall art and wall hangings. The fixed margin mainly irritates me because it’s one of my most expensive sites, and I make the least percentage of profit from it out of all 18 of my print-on-demand stores.

One last drawback to Society6 is that they don’t send you notifications for anything. This could turn out to be me not hitting the proper buttons to get email notifications, but whereas Redbubble automatically emails me when I make a sale, when I have a new follower, and when I have messages, I have never gotten a notification from Society6 about any of that. I tend to just get random $5.07 or so amounts sent to my Paypal account, and this usually confuses me until I open up my Society6 earnings and see that the amounts sent exactly match my profits from products that I often find I sold months ago.

Besides these three main areas of inconvenience, Society6 is an alright sales platform. It takes my keywords (“oliviahathaway,” “ohartisticoddities,” and “okhismakingart”) properly so that you can search my work on the main site with them even if you don’t have my direct store link. The products look good, the search process is organized, and your best/most recent selling/liked designs automatically get shoved to the front on the main page for your website. I’ll get more into the interworkings of the site in the next post, but this is the brief overview of how Society6 compares to Redbubble and print-on-demand sites in general.

Redbubble: Actually Getting an Account Set Up

I’ve sort of been writing these posts in reverse order because getting an account set up with Redbubble was the easy part for me, and then the actual uploading of designs was the difficult part. I did those posts first assuming some poor soul who can’t find the right image sizing for their products would need that information more than instructions on how to actually put in all the information to start an account in the first place. But here it is: How a Redbubble account works.

To sell on Redbubble, you will need a Paypal account or a bank account. I’m not sure if they have any other payment options, and Paypal protects you when you’re online shopping, so it’s worth it to bite the bullet and set up a Paypal account if you don’t already have one (which will require a credit card and/or bank account number also). Redbubble used to pay you any time you made a sale, but now there is a payment threshold of $20, and you get paid on the 15th of each month. This change probably has more to do with their middlemen for money transfer than it does with Redbubble itself though, so don’t judge them too harshly for that (there’s probably a money transfer fee under a certain amount like how some places won’t let you make a purchase under $5 with credit card because the fee would be more than the sale).

Redbubble is also neat because they let you choose your margin. They have a base price that makes them a profit, and then you choose how much extra to charge customers so that you make a profit. I set my margin to about 30% on all products because I think that’s reasonable without making my products prohibitively expensive. That means that if someone buys a $45 product from me, I make about $15 (30% or about 1/3 of the list price). You can change your margin on each individual product under “product pricing” which is one of the links in the list on the left side of your Redbubble dashboard. Redbubble will also ask for a contact email because they send you invoices for your records every time you make a sale. You’ll get the sale email and then an invoice a few days later. To be clear (and it always says this on the invoice), Redbubble pays all the manufacturing fees for you. You make money when they make money, and you’ll never pay Redbubble for anything unless you order something from them for yourself.

During the account set-up process, Redbubble will also let you upload a profile picture and banner, type out a short and a long bio, and link other social media profiles to your your Redbubble homepage. Your uploaded profile picture and banner will likely get cropped in the process, but at least for the banner, no matter what image dimensions you upload, Redbubble will make it fit and cover the banner space (likely cutting off a good bit of your image if it’s a longer than it is wide). The short bio appears under your profile picture and gives people a quick blurb about you and your store. The long bio can also be included on your main page if you have a longer story to tell about your art for those interested.

As for linking other social media to your profile, when you initially do it, Redbubble gives you a few preset sites that you might be on, and if you have profiles there, just copy and paste your link in the given blanks. Once you do that and save, little icons for each profile will show up under your short bio and shop headings (shop, portfolio, followers, following, favorites, and favorites received). I have links for Facebook, Instagram, Twitter, Dribbble, Behance, Pinterest, DeviantArt, Flickr, and Google Plus.

That’s pretty much it for the main Redbubble set up process. There are miscellaneous other pieces of information that they might ask for or that you might choose to include, but the main things they need are a way to contact you, and a way to pay you.

Redbubble: Can I Upload in Multiple Windows?

Here’s a quick potential question that just popped into my head. What if you’re an artist with a large body of work that you want to post on Redbubble (I have 300+ designs), and you’re trying to find a way to upload it faster? You can open multiple tabs of the Redbubble uploader and upload designs in tandem. I’ve found that this works with Redbubble and Society6 all of the time, and you can try with all the other print on demand stores I sell on (some of them just have glitchy uploaders, and we’ll get to that) EXCEPT for CowCow. If you try to upload in multiple windows on CowCow, the designs will get crossed, and you’ll end up with a dress that has a sleeve from one design and a skirt, chest, and second sleeve from another. You might also get a product that’s missing panels of a design (on CowCow you choose an image for the background, front, back, and straps).

Redbubble: Product Quality

I may have mentioned this in passing before, but I’d also like to briefly talk about Redbubble’s product quality: It’s excellent. I have bought an A-line dress, a notebook, posters, tote bags (both types), stickers, pillow covers, and shirts from Redbubble. The A-line dresses are made of a slick material that cannot wrinkle, so it’s perfect for traveling. You can scrunch it up any way you’d like in a suitcase, and there’s nothing you can do to crease it. The notebooks are slightly smaller than I expected (more like an address book/planner size than the size of a school notebook), but that’s likely my fault because I believe they have the measurements for everything on the site. Otherwise, the notebook is great quality too: hard plastic spiral binding and a durable cover. The posters have a good weight to them, and they come rolled up (so there are no creases when they arrive). The tote bags are sturdy and the sewing holding the handle to the bag looks pretty durable and strong – especially for the kind that’s canvas with the black straps. I believe the stickers are vinyl (at least they feel like it). They’re the heavy duty kind that people put on their laptops and water bottles. There are throw pillow covers from Redbubble in my living room, and they’re made of a super soft material with a slight texture to it. The pillow covers for the 36″ x 36″ floor pillows are a slightly rougher material. The only downside to them is that Redbubble does not make an insert for those. I stuffed mine with two bags of PolyFill (stuffed animal stuffing). Finally, the shirts have a good print quality that so far seems to hold up in the washing machine. Those are all the products I can give personal reviews/descriptions of, but I’m confident that the rest are just as good.

Redbubble: The Importance of Putting Your Name in Your Tags and How to Use the “Copy” Function

One thing I did not anticipate about Redbubble is that it does not automatically link the artist or shop name of a creator to their work in any searchable way. When I started, I assumed that searching “OliviaHathaway” (my store name) would bring up all my work. My brain just figured that’s how it should work, but that was not the case. I had multiple friends searching my name on the site then messaging me to tell me they couldn’t find my stuff. I gave it a shot myself and found that even if you searched my shop name with exactly the right capitalization and spacing, what would come up was a main screen that appeared to show no search results (shown below for a bunch of random letters I searched) with the addition of some tiny print at the bottom that said something along the lines of “but we found a shop with this name.” + a link to click it. It’s so small compared to the “no search results screen” that most people wouldn’t notice it.

This is one of the only things I’ve ever been really irritated at Redbubble for, but really it was my fault for not tagging my work with my name (they give you total control of your title and tags, so there’s no reason to expect any automatic tagging). I had over 370 designs uploaded at this point, and I thought I was going to have to go back and add the tags in to each individually. I was determined to do it because people not being able to easily find my work was definitely going to stunt my ability to sell it. Thankfully though, Redbubble has the “Manage Portfolio” feature.

To find it, you hover over your tiny logged in profile icon in the upper right corner of your home screen (next to your followers, favorites, and sales stat icons) then scroll down to “Manage Portfolio.” This is the screen it takes me to when I click that:

The “Quick Edit” feature in the upper right opens up the title and tagging data for all my designs and lists them in columns. I can then just edit the title and tags directly from there instead of going to each design and opening up the big edit screen that includes things beyond that information (like positioning of images, background colors, etc.). This greatly sped up the process of adding my new set of tags to all my designs. For my work, I decided that all my designs should be tagged with my name (with and without spaces – olivia hathaway and oliviahathaway), my main social media handle (okhismakingart), and the name of my Etsy store and the associated Facebook page that I started when I was 14 (ohartisticoddities). Searching any of those in the Redbubble search bar now brings up all of my work.

In short, “Manage Portfolio” was a life saver (I just wrote out the tags in a list once, then copied and pasted them down the columns), but it is much easier to just properly tag your works from the start. It’s important to include your name in particular because family and friends can be a major source of sales, and they’re most likely going to remember your name better than your shop name or social media handles (especially if you have older relatives interested in your stuff).

P.S. “Manage Portfolio” can help you do some other mass edits as well. You can select all works displayed on a page with the tiny little check box at the upper left, or you can select designs individually with the white check boxes in the upper left of their display images. Selecting one or more works then opens options in the bar above the designs. You can use them to mass-move things to a collection, mass enable designs on certain products (this does not work well for me), set the default product that customers view when they search your work, and/or use the “More” option to mass edit the privacy/maturity settings on your works. You can also use the trash can to delete many designs at once. The settings gear symbol that appears in the upper right corner of each design also gives you some of these same options for that individual designs, but there’s an additional one called “Copy” that’s worth going over briefly.

Clicking “Copy” will take the settings you chose for that design and use them as a template for a new one. For example, if you used a logo-type image as a design and had it printed on your products as an offset grid, when you click “Copy” on that design, it will open up a new upload screen with the title as “Copy of [previous design’s name]” with the same image and all the tags that design originally had. If you then click the main image and upload a new one to replace it, it will upload and keep the grid lay out, the spacing, and the background color that you chose with the previous image exactly the same. This only works if your new image is the same size as your old one, but if you follow my advice on image sizing from the previous post, that shouldn’t be a problem. I used the “Copy” function A LOT when I was creating my collection of “Electric Field Art Repeating Designs”:

As you can see, between these floor pillows in “Electric Field Art III Repeating” (left) and “Electric Field Art II Repeating” (right), all I changed was the main image and the main background color. The grid pattern and sizing was left completely the same (and it worked that way on all products).

Links to my example products:

Note: the floor pillows only come as pillow covers and require separate purchase of stuffing/inserts, while pillows in any smaller size can be ordered as covers or “with insert.”

Electric Field Art II Repeating Floor Pillow: https://www.redbubble.com/people/oliviahathaway/works/38983889-electric-field-art-ii-repeating?asc=u&c=1112189-electric-field-art-repeating-patterns&p=floor-pillow&rel=carousel

Electric Field Art III Repeating Floor Pillow: https://www.redbubble.com/people/oliviahathaway/works/38981434-electric-field-art-iii-repeating?asc=u&c=1112189-electric-field-art-repeating-patterns&p=floor-pillow&rel=carousel

Redbubble: A Quick Start Guide

This and the next series of posts on Redbubble will together constitute a deep dive into almost every aspect of the site. For the sake of keeping the blog posts’ lengths in the realm of “digestible chunks,” I’ll first just start with the information I tend to rapid-fire at people when they mention they’d like to open a Redbubble store (I’ve helped three people get set up).

In my opinion, Redbubble has the best uploader of any print-on-demand site. It takes one “main image” that you upload and auto-enables it on 65 products. You can then easily go in and “turn off” certain products, adjust how your image looks on individual items, and use a built in tiling feature to create grid or offset grid patterns from your image if you so choose. However, before you get in to playing with all those features (and many others that are available), there is a key piece of information that you need that is very hard to find.

In order to get your images to enable on all 65 products automatically, they need to be a certain size: 13500 x 11462 pixels. The wall tapestries are what makes that the necessary size. They’re the biggest product, and that’s their minimum set of dimensions for full coverage. If you use a smaller size, you’re likely to get tiny boxes with your image in the center of some of your items like I initially did. My friend Ethan thought he was going to have to find a whole new website to sell wall tapestries because he couldn’t figure out what the proper size was – like I said, not super available information.

Now here’s the next somewhat tricky part: Most laptops do not have a built in image resizer, and scanned images and uploaded photographs are not automatically going to be in that size. What you need is an extension for image resizing, and I use Image Resizer for Windows (available here: https://www.bricelam.net/ImageResizer/ ). It’s completely free to download and use. Once you download it and install the application, you should see the option to resize any image in your gallery that you right click on. Here’s a picture:

Before you download the application, that option will not be there. Once you click it, a box opens that will give you four preset sizes you can choose from and an option to type your dimensions into a custom box at the bottom. Use that to resize your image to 13500 x 11462:

The settings above should resize your image to work on all Redbubble products (just select the custom option instead of the “small” option like I have in the picture). After you click “Resize,” the new image should appear right next to the old one but with “(Custom)” added after the original title. That is the file you should select and upload to Redbubble.

Now that’s enough to get your uploaded designs looking nice and covering all the products. After you upload a “main image” you can also click on products and upload different images/adjust the uploaded image individually if you need to. One instance where you might want to do this is if you have a transparent “logo-type” image that you want to upload to T-shirts while you want the main image to be an all-over print:

Above is my “Favorite Rose” design, and as you can see, I uploaded a “cut-out” image of the rose for the T-shirts, but left the original photo as an all-over print for device cases. If you are using a cut-out image as your main image, you can also choose a background color (either for all products in the menu underneath the main image upload space or for individual ones by clicking the product, then selecting a background color). Example:

I also have my Favorite Rose design uploaded separately as “Favorite Rose Repeating” where I only use the cut-out image + the offset grid function and a black background. P.S. I cut out the image using a phone app called PicsArt (it has a function called “free crop,” and I traced out the whole rose with my finger to get that image).

The last thing you need to know before you start uploading products is that you absolutely need to include your shop name and your actual name in the tags of your designs (you get to choose up to 50 tags and the title when you upload an image). I’ll explain more on why in the next post, but believe me, it’s super important to make your work “findable.”

Links to my own products featured above:

Favorite Rose (scroll down to see products): https://www.redbubble.com/people/oliviahathaway/works/34090981-favorite-rose?asc=u&c=972523-queen-marys-rose-garden

Favorite Rose Repeating A-Line Dress: https://www.redbubble.com/people/oliviahathaway/works/42343685-favorite-rose-repeating?asc=u&c=972523-queen-marys-rose-garden&p=a-line-dress&rel=carousel

Design a site like this with WordPress.com
Get started